Connecting your Xerox printer to a computer is essential for smooth printing and scanning. Whether you’re setting up a printer for the first time or reconnecting after a Windows system update, we’ll clarify this process. When learning how to connect a Xerox printer to a computer, you must know of the major connection methods, i.e., USB, Ethernet, and wireless. Your connection method depends on how your system is connected to the network.
Methods to Connect Xerox Printer to Computer
The key connection methods include
- USB connection (for local printers)
- Wireless connection (if you have a Wi-Fi router or access point)
- Ethernet connection (for shared office environments)
How to Connect a Xerox Printer to a Computer with USB?
Owners of a local printer who want a simple plug-and-play setup can connect the Xerox printer to computer via USB. But before that, check whether your printer’s USB Type B port is set to Printer Port.
- Prepare the printer by switching it on.
- Make sure it’s not in energy saver or sleep mode.
- Ensure no error messages are displayed on the screen.
- Connect the B end of a standard A/B USB 2.0 or USB 3.0 cable to the USB Port, which is on the back of the printer.
- Now, link the A end of the USB cable to the USB port on the PC.
- Cancel the Windows Found New Hardware Wizard message.
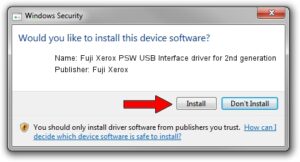
- Install the printer driver. Windows usually auto-detects and installs the basic driver.
- For best performance, download the latest driver from the Xerox Support Site.
- Download the .zip file of your Xerox drivers from Xerox.com in a .zip file.
- Install the drivers using the Windows Add Printer Wizard.
- Go to Control Panel > Devices and Printers.
- Right-click your Xerox printer, and select Set as Default Printer.
- If you have a Mac, go to System Preferences > Printers & Scanners. Select your printer and click Default.
Installing Drivers for a Windows USB Xerox Printer
Use the free utility Xerox Smart Start—Driver Installer to install the correct driver and setup the printer quickly. For it, you need to insert the Software and Documentation disc into the right drive on your computer. If the installer does not start automatically, double-click the Setup.exe installer file in the drive section.
- Click Xerox Smart Start—Driver Installer (Recommended).
- Agree to the License Agreement.
- Select your printer, then tap Quick Install.
- Tap Done when the installation completes.
How to Connect a Xerox Printer to a Computer Wirelessly?
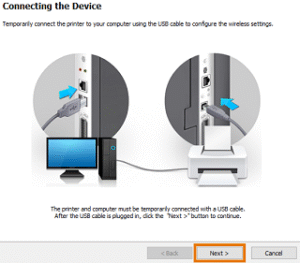
You can use the wireless wizard or the embedded web server to connect a Xerox printer to a computer wirelessly.
Using the Wireless Wizard on the Printer
This is the easiest way to set up your Xerox printer for Wi‑Fi connection.
- Plug in the wireless adapter into an active USB port on the printer.
- On the printer control panel, go to Home → Continue Wireless Install (if it’s your first time).
- Alternatively, activate Wireless (to reconnect to a previously used network) or pick New Network to scan for others.
- Log in as System Administrator, if prompted.
- Select the desired SSID.
- If the network is secure, enter your network password.
- Tap to connect to the chosen network.
- After the connection has been configured, tap Done.
Using the Embedded Web Server (EWS)
For advanced configuration in enterprise environments or when certificates are involved, connect your printer to a network through EWS.
- Access the printer’s Embedded Web Server. For this, use the current IP address in a browser.
- Log in as System Administrator.
- Navigate to Properties → Connectivity → Setup.
- Under Xerox Wireless Network Interface, click Edit.
- Then configure IP settings (IPv4/IPv6, DHCP/static) and wireless Settings, including scanning for available SSIDs, selecting network, and entering security credentials or certificates as required.
- Click Make Active to switch from wired to wireless mode.
- Confirm when prompted and log out of the wireless interface when finished.
How to Connect a Xerox Printer to a Computer Via Ethernet?
Ethernet connection is extremely fast and supports various devices, like printers and computers, at a single time. To get this advantage, you must use a Category 5 or higher Ethernet cable.
- Power off the printer.
- Connect one end of the cable to the Ethernet port on your printer.
- Connect the other end to a correctly configured network port on a hub or router.
- Connect the power cord to the printer.
- Next, plug the cord into a power outlet.
- Turn on the printer and enter the printer IP address.
Concluding Words
Hopefully now, you won’t have doubts about connecting your Xerox printer to computer. Use a method depending on your current connection and follow the steps. Ensure to use the latest drivers and update your OS to connect the printer securely. If you face an issue, contact Xerox printer support.
Frequently Asked Questions
1. How do I connect Xerox B230 to my computer via USB?
Make sure you are using a A/B USB 2.0 cable. If it is damaged, replace the cable. Connect the cable securely on the port at the back of the printer. Check for any warning lights.
2. How do I add a Xerox printer to my computer?
Use the Printers and Scanners menu to add your printer. Choose the option Add a printer using a TCP/IP address or hostname. Next, select your print driver and type your printer’s name. Follow the prompts to finish the process.
3. Why is my Xerox printer not connecting?
Configure TCP/IP ports and save the settings. If the issue persists, go to the Restricted Server List and check whether your printer’s IP address is there. If yes, remove it. Reboot your printer and computer and then configure the connection.