Replacing a toner cartridge in a Brother printer is simple, but following the correct steps helps with high print quality and keeps the machine functioning smoothly. The easy steps include opening the cover, removing the drum unit, and replacing the empty toner carefully. In this blog, we’ll explain these steps in more detail and give model specific instructions for replacing toner in popular Brother printer models, like HL-2370DW and HL-L2370DW.
How to Replace a Toner on a Brother Printer?
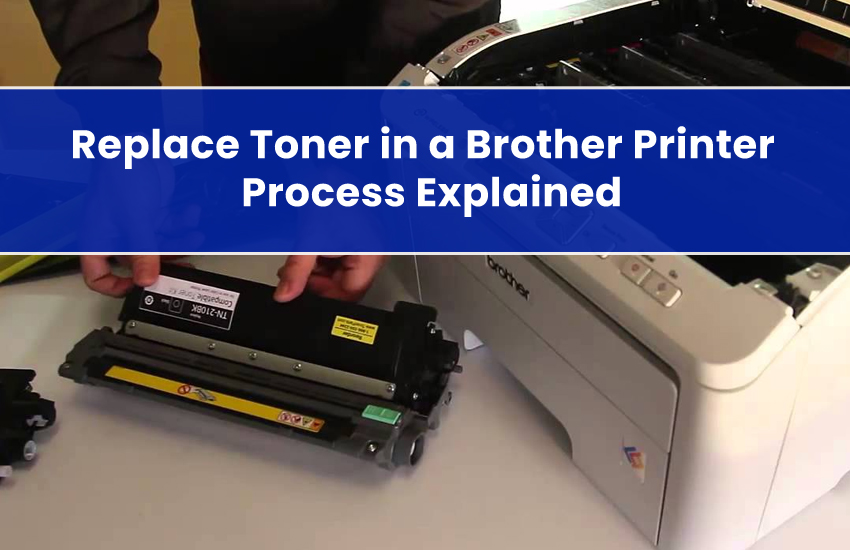
On most Brother printers, open the front cover, remove the drum unit, and release the toner. Put the new cartridge into the drum and reinstall the assembly. You should start using the printer with the new cartridge only when the Ready message appears. Also, make sure to use genuine Brother toner cartridges.
General Toner Replacement Steps for Brother Printer
Here are the detailed steps to replace toner in your printer:
- Turn on the printer and make sure it’s in Ready Mode.
- Open the front cover using the release button.
- Remove the drum unit and toner cartridge assembly by pulling the handle gently.
- Press the green lock lever to release the toner from the drum unit; avoid touching the drum roller.
- Unpack the new toner cartridge, remove protective covers, and gently shake side-to-side to distribute toner evenly.
- Install the new toner into the drum unit until it clicks in place. Clean the corona wire by sliding the green tab left and right, aligning arrows for proper positioning.
- Reinstall the assembly back into the machine, close the front cover, and wait until Ready Mode appears.
How to Replace Toner in Brother HL-2370DW and HL-L2370DW
To replace toner in these Brother printer models, follow these steps:
- Remove the drum and toner assembly as described above and place it on a flat, clean surface.
- Press the green lock to separate the toner, then install the new cartridge and reassemble.
- For persistent “Replace Toner” errors, manually reset by opening the front cover.
- Press the Back and GO buttons together.
- Now, follow the prompts on the printer display.
How to Replace Toner in Brother DCP-L2540DW & DCP L2640DW
DCP-L2540DW & DCP L2640DW have a green lock lever. You need to hold it and then replace the drum unit. Here are the detailed instructions:
- Remove the drum assembly.
- Replace the cartridge.
- Now, clean the corona wire.
- Reinstall the cartridge and ensure correct alignment.
How to Change Toner in Brother MFC-L2710DW?
Change the toner in Brother MFC-L2710DW using these pointers:
- Open the front cover.
- Remove the drum unit and toner assembly.
- Place these things on a flat surface.
- Remove the cartridge from the drum by pressing the green lock lever.
- Unpack the new toner.
- Install the toner into the drum unit.
- Now, let everything lock into place.
How to Change Toner in Brother HL-L2395DW & HL-L2350DW?
Here is the process to change toner in Brother HL-L2395DW & HL-L2350DW.
- Power on the printer and open the front cover.
- Pull out the drum and toner assembly by the handle.
- Press the green lock lever on the drum. It will release the toner cartridge.
- Now, lift the cartridge out.
- Unpack a new toner (TN-760 high-yield or TN-730 standard).
- Gently rock it side-to-side, remove any protective cover.
- Insert the new toner into the drum until it clicks.
- Slide the green tab on the drum left-to-right a few times to clean the corona wire.
- Return the wire to the “▲” home mark.
- Reinstall the drum unit and toner assembly.
- Lastly, close the front cover.
What to Do When Brother Printer Doesn’t Print After Changing Cartridges?
If the printer doesn’t print, you may have installed the cartridges incorrectly. A faulty cartridge or clogged printhead nozzles are other reasons. To fix this issue,
- Verify the installation of the ink cartridges.
- Print the Print Quality Check Sheet.
- Go to Settings and then General Setup.
- Hit Maintenance.
- Choose Impr. PrintQuality twice.
- Press OK and you will see the Print Quality Check Sheet.
- Look at the nozzle check pattern.
- If print head cleaning is needed, following the printer’s display instructions.
- Power-cycle the printer and attempt resetting again if the error remains.
- Avoid refilling or using third-party cartridges. It might be causing print issues.
- Clean the corona wire (slide the green tab several times). This will optimize the print quality.
Concluding Words
Now you know how to replace a toner cartridge in a Brother printer. This process requires just a few careful steps, like removing the old toner, installing the new one, resetting counters if needed, and using genuine parts. Also, consult your Brother printer’s specific manual or the official Brother printer support site to get the most reliable, up-to-date instructions.
Frequently Asked Questions
1. How do I replace the toner cartridge in a Brother printer?
To replace a Brother toner cartridge, turn on the printer, open the front cover, and remove the drum and toner assembly. Press the lever to release the toner from the drum, unpack a new cartridge, gently shake it side to side, install it into the drum until it clicks, clean the corona wire, and reinstall the drum assembly. Close the cover and wait for Ready Mode.
2. Why does my Brother printer show “Replace Toner” error after installing a new cartridge?
Ensure you’ve installed a brand new, unused toner cartridge (not a reused or partially used one). Confirm the cartridge is correctly installed with the drum unit. Clean the corona wire. If the issue remains, try manually resetting the toner or consult support.
3. How do I reset the toner counter on my Brother printer?
To reset the toner counter, open the front cover and access the printer’s reset menu (often by quickly pressing specific buttons like “Back” and “Cancel”). Use the on-screen menu to select and confirm the toner type to reset. After acceptance, close the cover for the changes to take effect.