The WPS or the Push button method helps you connect your Canon printer to the wireless router or gateway. The presence of this button is incredibly beneficial if you run an organization that focuses on optimal output with a minimum number of systems. When you know where is WPS button on the Canon printer is, you can link it to every single PC and print the needed documents.
There are two ways to find out the WPS button is used to connect devices to a network. The second method entails connecting your Canon printer to the WLAN network to access WPS settings. This is for those whose Canon printer doesn’t have the WPS button on the panel.
Use the WPS Method to Setup the Wireless Connection
This method uses the WPS button on your Canon printer to set up a wireless connection. When you enable the button on your printer and router, the device will automatically link to the network.
- On the Canon printer panel, find the ‘WPS’ button.
- If this button is activated, you can view the Wi-Fi lamp blinking on your Canon printer.
- Press this button on your router.
- The devices will get connected in just two minutes.
- However, if you haven’t activated the button within two minutes on your router, the devices won’t connect.
- While setting up your Canon printer to the router, switch off the Wi-Fi connection on unpaired devices. It will facilitate faster connectivity.
- When your printer is successfully connected wirelessly to your router, you will not face problems like the Canon printer offline.
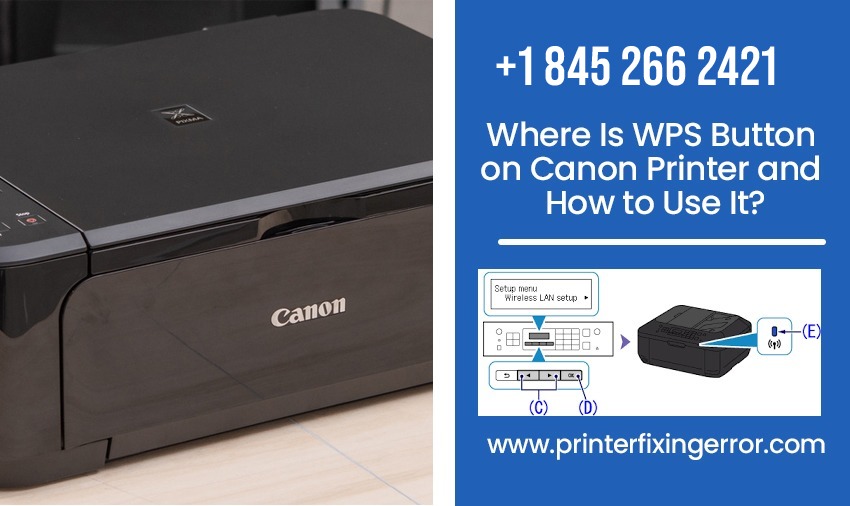
Use the WPS Settings Menu to Connect the Printer to WLAN Network
Hopefully, you have now received an answer to your question about where is the WPS button on my Canon printer. It is present on the Canon printer panel. However, if you have a Canon printer model without the WPS button on the board, it is still possible to connect it to the WLAN network.
Here are some different ways to accomplish this process.
You can use the ‘HOME’ button to access WPS settings on your Canon printer.
- Use the ‘Menu’ button to enter the ‘Setup’ menu of the printer. This button is present on the printer panel.
- Go to the ‘WLAN’ icon on the screen through the arrow keys.
- Select the ‘Left’ function key.
- On the ‘Settings’ screen, go to ‘Wireless LAN Setup’ through the arrow keys on the printer panel.
- Now hit ‘OK.’
- You will see the Wi-Fi lamp on the printer panel flashing when the printer’s wireless connection is set up.
- Go to the ‘WPS’ tab in the Wireless LAN Setup screen.
- Hit ‘OK’ to choose this option.
- On the new screen, hit ‘OK’ to confirm your choice.
- Hit the WPS button on the router for two minutes to establish the connection.
- Now hit the ‘OK’ button on your printer in two minutes to link the printer to the LAN network.
This method makes use of the setup button on your Canon printer panel to connect it to WLAN. If you know where the WLAN settings are but are asking where is WPS button on the Canon printer is, use the Setup button.
- The ‘Tools’ icon shows the setup button on the printer’s panel.
- Press the ‘Setup’ button.
- Now, navigate to the ‘Wireless LAN Setup’ tab.
- Hit ‘OK’ on the setup menu.
- After that, press the ‘Stop/Reset’ button on the panel.
- Next, choose ‘Wireless LAN Setup Standard Setup’ that you see on the screen.
- Hit ‘OK’ on the panel after that.
- Now, select a particular network on your screen.
- Press ‘OK’ two times.
- Choose ‘Search Again’ if you don’t find any network on the screen.
- Next, press ‘OK.’
- Use the numeric keys on the panel of the printer to input the security passcode.
- After that, press ‘OK.’
- You can toggle between uppercase and lowercase characters using the * key.
- Now, press ‘OK’ to let the setup process complete.
- You will see your Canon printer connected to the Wi-Fi network.
- A good connection will also prevent you from finding your Canon printer not printing color correctly.
What to Do If You Cannot Setup Wireless LAN Through WPS?
Sometimes, you may complete the entire process of connecting the printer to a wireless router through WPS but find an error screen appearing. This happens when you attempt connections from various wireless routers simultaneously.
The solution is to wait for some time and then configure the WPS settings. Hit the ‘WPS’ button on only a single wireless router.
If you see the timeout error, it is because the WPS setup was not completed within a particular time. Turn off the network device, such as the router, and then turn it on to fix the problem.
Concluding Words
You can now easily connect your Canon printer to various devices after learning to locate the WPS button. Use the WPS button on the Canon printer or access it through the WPS settings menu as per your printer model. If you need more printer fixing error assistance, avail yourself of professional help.
Frequently Asked Questions
The WPS button isn’t there on this printer model. It is present on the router. If your router doesn’t have a WPS button, use the CD that came with your PC to establish wireless installation.
The WPS button is present on the router. To link your printer wirelessly, head to the ‘Home’ menu and use the arrow keys till you see ‘Wireless LAN Setup’ appearing. Choose this option. When you see the WPS prompt, hit ‘Stop.’ Finally, choose the ‘Standard Setup’ option. Now adhere to the rest of the prompts.
You must check your access point or router for an automatic connection button called WPS. Once you locate that, it is easy to link your devices to the network without a password. For more information regarding the WPS button, review the device’s user guide.
Related Resources: